
Hierarchical Z-Buffer Occlusion Culling
While I was at GDC I had the pleasure of attending the Rendering with Conviction talk by Stephen Hill, one of the topics was so cool that I thought it would be fun to try it out. The hierarchical z-buffer solution presented at GDC borrows heavily from this paper, Siggraph 2008 Advances in Real-Time Rendering (Section 3.3.3). Though I ran into a fair number of issues trying to get the AMD implementation working, a lot of the math is too simplistic and does not take into account perspective distortions and the proper width of the sphere in screen space so you end up with false negatives.
You should read the papers to get a firm grasp of the algorithm, but here is my take on the process and some implementation notes of my own.
Hierarchical Z-Buffer Culling Steps
- Bake step – Have your artists prepare occlusion geometry for things in the world that make sense as occluders, buildings, walls…etc. They should all be super cheap to render, boxes/planes. I actually ran across this paper, Geometric Simplification For Efficient Occlusion Culling In Urban Scenes, that sounded like a neat way of automating the process.
- CPU – Take all the occlusion meshes and frustum cull them.
- GPU – Render the remaining occluders to a ‘depth buffer’. The depth buffer should not be full sized, in my code I’m using 512×256. There is a Frostbite paper that mentions using a 256×114-ish sized buffer for a similar solution to do occlusion culling. The ‘depth buffer’ should just be mip 0 in a full mip chain of render targets (not the actual depth buffer).
- GPU – Now downsample the RT containing depth information filling out the entire mipchain. You’ll do this by rendering a fullscreen effect with a pixel shader taking the last level of the mip chain and down sampling it into the next, preserving the highest depth value in a sample group of 4 pixels. For DX11, you can just constrain the shader resource view so that you can both read and render from the same mip chain. For DX9 you’ll have to use StretchRect to copy from a second mip chain, since you can’t sample and render to the same mip chain in DX9. In my code I actually found a more optimized solution, by ping-ponging between 2 mip chains one containing even and the other odd levels, and a single branch in your shader code you can get around the overhead of having to do the StretchRect and just sample from a different mip chain based on the even/odd mip level you need.
- CPU – Gather all the bounding spheres for everything in your level that could possibly be visible.
- GPU – DX11 send the list of bounds to a compute shader, which computes the screen space width of the sphere then uses the width to compute the mip level to sample from the HiZ map generated in step 4, such that the sphere covers no more than 2 pixels wide. So large objects in screen space will sample from very high values in the mip chain since they require a coarse view of the world. Whereas small objects in screen space will sample from very low values in the mip chain. In DX9 the process is basically the same, the only difference is that you’ll render a point list of vertices, that instead of a Float3 position are Float4 bounds (xyz = position, w = radius). You’ll also send down a stream of texcoords that will represent x/y pixel values of where to encode the results of the occlusion test for that bound. Instead of a compute shader you’ll process the vertices using a vertex shader, you’ll also need to use the pixel location provided in the texcoord stream to make sure the results of the test are written out to that point in a render target, and in a pixel shader you’ll need to do the sampling to test to see if it’s visible, and output a color like white for culled, black for visible.
- CPU – Try to do some work on the CPU after the occluder rendering and culling process is kicked off, for me the entire process took about 0.74 ms of GPU time on a Radeon 5450, with 900 bounds. The overhead of generating the HiZ mip chain and dispatching the culling process is the real bottleneck though, there’s little difference between 900 bounds and 10,000 bounds.
- CPU – Read back the results. DX11 you’re just reading back a buffer output by a compute shader. For DX9 you’ll have to copy the render target rendered to in step 6 containing the checker pattern of black and white pixels and then iterate over the pixels on the CPU to know what is visible and what is hidden.
Hierarchical Z-Buffer Downsampling Code
The downsampling is pretty much what you would expect, you take the current pixel, sample one pixel to the right, bottom and bottom right. You take the furthest depth value and use it as the new depth in the downsampled pixel. Here’s an example of a before and after version, black is a closer depth, the whiter a pixel is the further away / higher the depth value.
Before Downsample

After Downsample

The downsampling HLSL code looks like this:
Hierarchical Z-Buffer Culling Code
Here’s the heart of the algorithm, the culling. One note, [numthreads(1,1,1)] is terrible for performance with compute shaders. Anyone planning to use this should do a better job of their thread group and thread management than I did. This is the DX11 compute shader version, I decided to use it here since it’s clearer what the intentions are. You’ll find the DX9 code in the full sample at the bottom of the post.
Sample
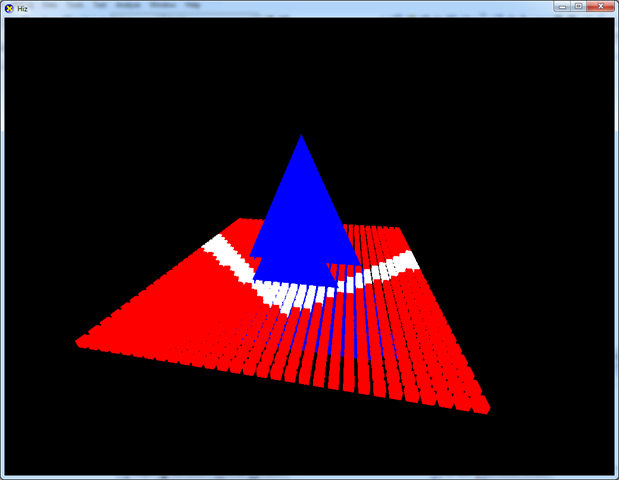
Here’s my sample implementation of the Hierarchical Z-Buffer Culling solution in DX11 and DX9. Some notes, during one of my iterations I disabled the code for rendering a visible representation of the occluders which are just two triangles hardcoded in a vertex buffer to be rendered every frame. Also, DX9 doesn’t actually render anything based on the results. I was just using PIX to test my output of the cull render target and was more focused on getting it working in DX11. The controls are the arrow keys to move the camera around. Red boxes represent culled boxes, white boxes are the visible ones.
Notes
I haven’t quite figured out how to deal with shadows. I’ve sort of figured out how to cull the objects whose shadows you can’t possibly see, but not really. Stephen mentions using a tactic similar to the one presented in this paper, CC Shadow Volumes. I wasn’t able to figure it out in the hour I spent going over the paper and haven’t really found the time to revisit it.
Update 7/5/2010
I’ve added a new post on how to solve the problem of culling objects that cast shadows.
Update 6/26/2011
I’ve been doing some additional research into generating occluders. It doesn’t completely solve it, but it’s a start. Further work is needed.
Update 4/13/2012
I’ve started a project to automatically generate the occluders to be used with Hi-Z occlusion culling, Oxel!